General String Instrument Care and Maintenance
At the beginning of each school year I like to review basic string instrument care and maintenance with my students. Younger students may not be sure how to care for their new instrument and older students might benefit from a refresher. This beginning of the year review also helps reinforce the parts of their instrument and what to look out for if something doesn’t feel quite right with their instrument.
This post will provide general information that can be shared with your students and some tips for how they can care for and maintain their instrument. I tell my students that if they ever have questions about their instrument they should reach out to me, another string teacher, or a qualified luthier.
1.Temperature and Humidity:
String instruments are mostly made of wood. Wood expands and contracts during the different seasons of the year – during the summer wood expands, during the winter it contracts. This change in weather could cause cracks in the seams of an instrument or minor buzzing. Just be aware of any buzzing or cracks that may occur. If a crack occurs, take your instrument to a luthier for repair.
Tip #1: Keep your instrument in a temperature controlled room.
Tip #2: Keep your instrument away from areas of your house/apartment where the temperature changes (window, vent, etc.)
Tip #3: Avoid keeping your instrument in the car for too long.
2. Tuning Pegs: Tuning pegs are what adjust the pitch of an instrument and keep an instrument in tune. Be aware if the pegs slip or are sticking. Pegs are often made of ebony wood and also expand and contract.
Tip #1: If pegs are sticking, they may need to be slightly resized. A luthier can adjust the sizing for you.
Tip #2: Peg lubricant can sometimes help pegs that are slipping.
3. Cleaning: It is important to clean your instrument after you play. Dust and rosin can build up in excess and begin to stick to the body of your instrument, your strings, and fingerboard.
Tip #1: Wipe your strings clean with a soft cloth or scrubby pad to get rid of any excess rosin after you play.
Tip #2: Wipe the body of your instrument to clean away excess rosin and grit.
Tip #3: Kolstein All Instrument cleaner can get excess grim and grit off of you fingerboard and the body of your instrument. Only a little is needed and should be used with a clean cloth. *Use with care as it has a very strong odor and guidance.
Tip #4: Use a small piece of steel wool to clean off rosin/grit from your fingerboard. Wipe down with a paper towel and a little water, then dry.
4. Strings: Strings lose their sound after some time. Musicians that play very often change their strings as much as every six months. How often you change your strings is a personal preference, some musicians like the sound of a “dead” string. It would be recommended to change your strings once every year. New strings will go out of tune frequently and need some time to break in and begin sounding their best – like a new pair of shoes or jeans!
Tip #1: If you try to change your strings yourself always keep tension on the bridge and only change one string at a time.
Tip #2: Violin: Begin with A, D, G, and E. Viola/Cello: Begin with D, G, C, and A. Bass: E and A off first, then D and G.
Tip #3: Wind the string around the peg at least once and make sure it has a snug fit in the peg box.
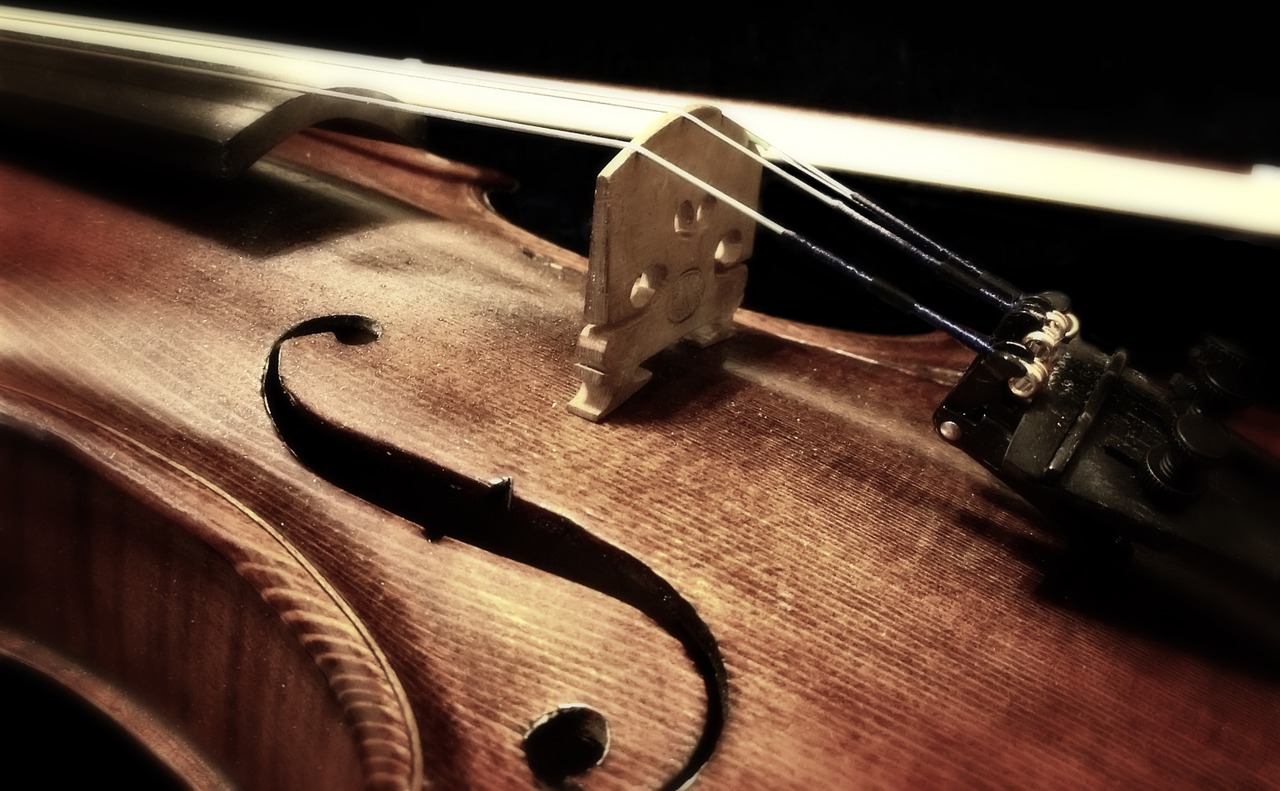
5. Bridge: The bridge is what holds the tension of the strings and transfers the sound of the strings to the instrument. Bridges are fragile pieces of wood and should be cut and fitted by a luthier.
Tip #1: Make sure your bridge is not tilting forward or backward.
Tip #2: Regularly check the position of your bridge, make sure it is in line with your fingerboard and not tilting.
Tip #3: Prevent any damage to the bridge or movement of the bridge by protecting it from being bumped or knocked around.
6. Sound Post: The sound post projects the sound of your instrument and helps to transmit the sound of the strings.
Tip #1: Make sure your sound post is always standing up. If it gets knocked down and you hear rattling inside your instrument, take it to a luthier to get the sound post reset.
7. Bow: The bow is made up of the stick, tip, horsehair, frog, and eyelet.
Tip #1: Always loosen your bow after you play. A bow that remains tightened will warp and loose its curvature (camber).
Tip #2: Careful to not hit the tip of your bow. The tip protects the horsehair.
Tip #3: Horsehair will break off over time and you will need a bow rehair. A qualified luthier can perform this for you.
Tip #4: If your bow won’t tighten, the eyelet inside the frog may need to be replaced.
Tip #5: Horsehair can be cleaned with denatured alcohol and a paper towel.
Along with this guide, I also do a lesson on the parts of a string instrument. We use a worksheet and label all the parts of their instrument. This helps students learn about their instrument and gives them key vocabulary for use in the string classroom. Later in the year, I will test them on this key vocabulary by giving them the same worksheet as an assessment.
Excellent and information and article!
[…] which are typically steeply discounted. Violin strings are a very delicate string, so here are some general string care and maintenance tips for […]