Double Bass 101: Left Hand Technique Fundamentals
Learning the double bass is a challenging pursuit. Building the endurance, muscles, and dexterity to get around the bass takes time and diligence. Young musicians looking to learn the bass will have to work at developing both solid left hand and right hand technique.
This post comes from my many years teaching privately and as a public school orchestra director where I’ve noted various left hand technique challenges in my young bass students. If you are an educator as well, I’m sure you’ve experienced and noted similar challenges in your bass players. Therefore, let’s cover some basics of helping young bassists develop a solid, foundational left hand technique.
First Steps
Just as in all string playing technique, the hands do not exist in isolation of themselves. The hand, wrist, arm, elbow all work together and are connected when playing. To get students started, I will have them stand in a comfortable, relaxed position with feet roughly shoulder width apart. Sometimes I do this while they have their bass positioned and other times I have them step away from the bass. You can experiment with both. I have students relax their arms at their sides. From that point I have students bring their arm up – almost as if they were going to take a drink from a cup.
I point out that their elbows are naturally bent, their fingers naturally curve, their hand is relaxed, and they don’t have to do much from this point to play or position their left hand on the neck of the bass. This initial step is to just simulate the feeling of the left hand and arm as it would be positioned on the neck of the bass. I even have them practice bringing their left hand up and to the neck of the bass several times to get comfortable with this range of motion.
Additionally, it’s important to note to students that their hand, arm, and fingers should be in a horizontal or parallel position to the floor. This is so important to keep when playing the bass. Many students get fatigued while they are playing and the picture perfect hand position they had earlier in the session begins to slip, as a result. Reminders of this horizontal or parallel principle are so important. If possible and the time permits, I have my students stop, reassess, and correct themselves and then continue on.
Shape
Next, the shape of the hand. To further provide students with a framework for the shape of the hand, I give them the idea that they should imagine themselves holding a can or a cup. The thumb is aligned with the fingers and serves as the anchor behind the neck of the bass. Again, the thumb and fingers should all be horizontal to the floor. The fingers are naturally curved.
I do note to students that playing in thumb position is different and the game changes, but in the lower position on the bass, the left hand fingers and hand should be parallel to the floor. The hand should be as relaxed as possible and free of tension. Another visual or simulation that might help would be to have students create the shape of a ‘C’ with their hand. Naturally, the fingers curve and the thumb is aligned with the fingers.
Starting Students On The Neck
A very helpful starting point for developing solid left hand fundamentals would be to start students off at the neck block or heel of the bass (see example 1 and 2). This idea stems from the great bass pedagogue, George Vance. The reason for this, as illustrated in his method – Progressive Repertoire – is that the hands fit much better around the neck of the bass and the space between notes is much more accessible for students at the neck block. The hand does not have to stretch or spread out as much as it does in the lower positions. Starting young bassists at the neck block seems to make sense based upon the size of their hands and the spacing between notes.
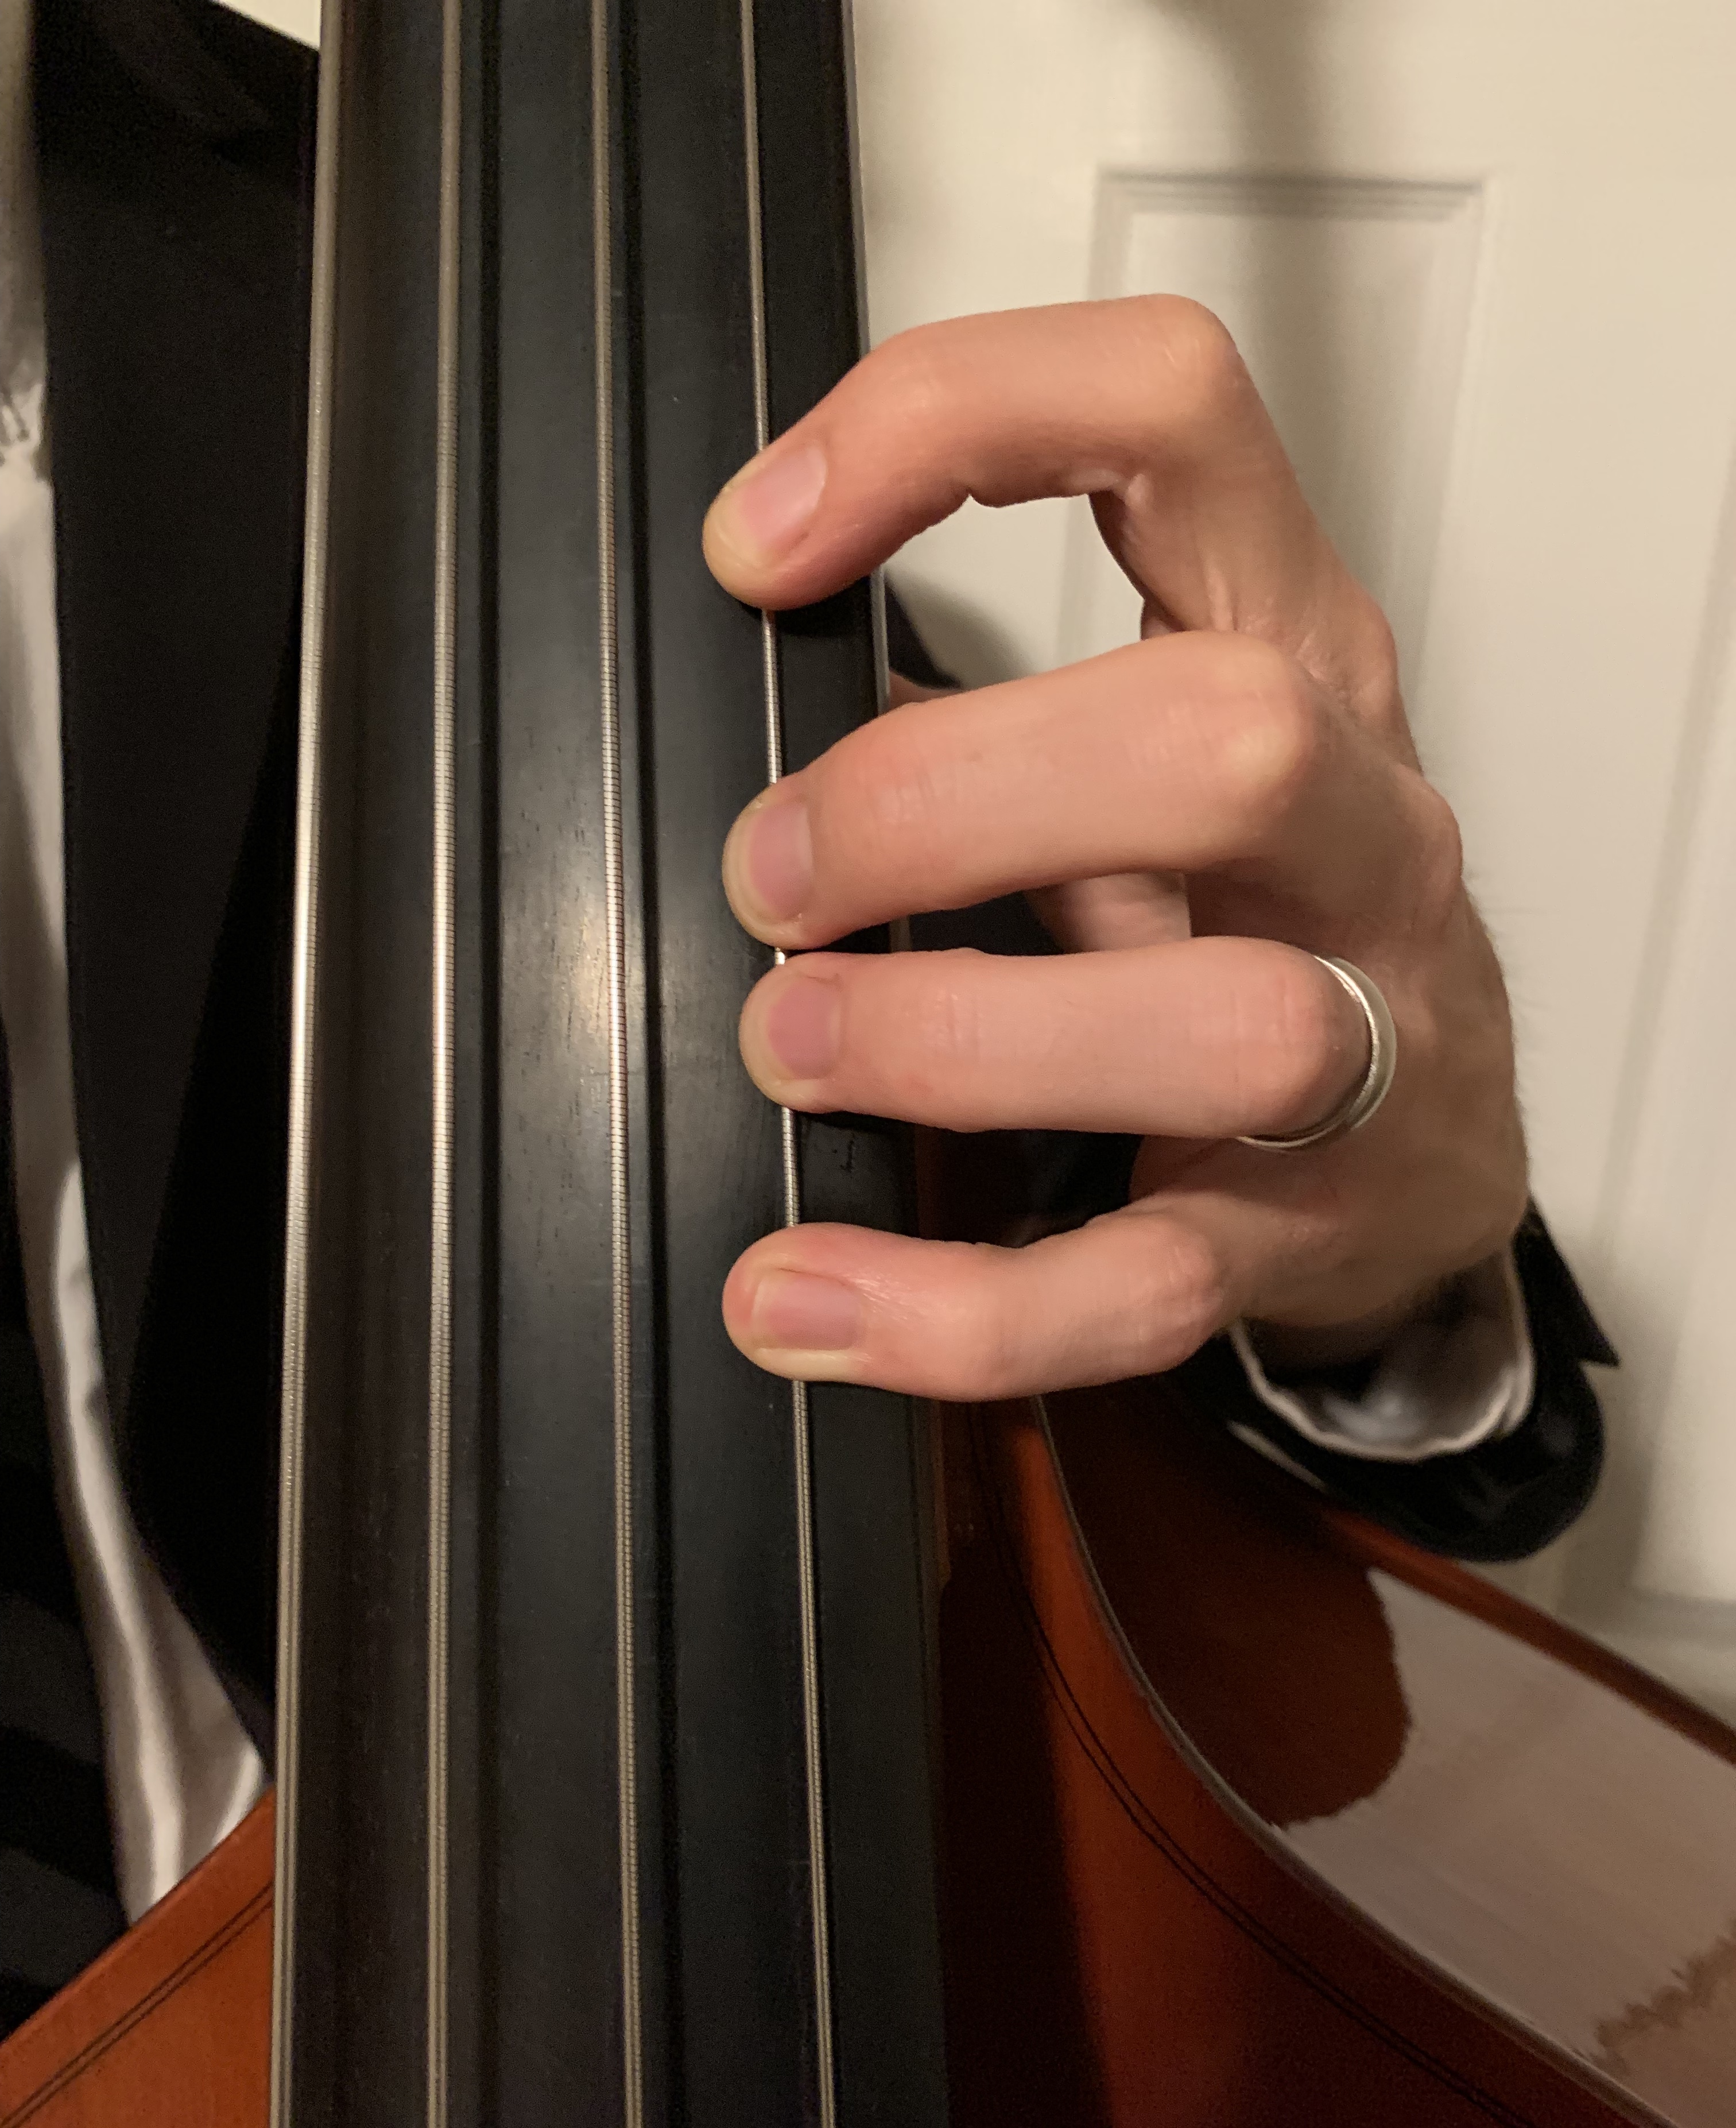
Example 1: Left hand in 3rd position, front view.
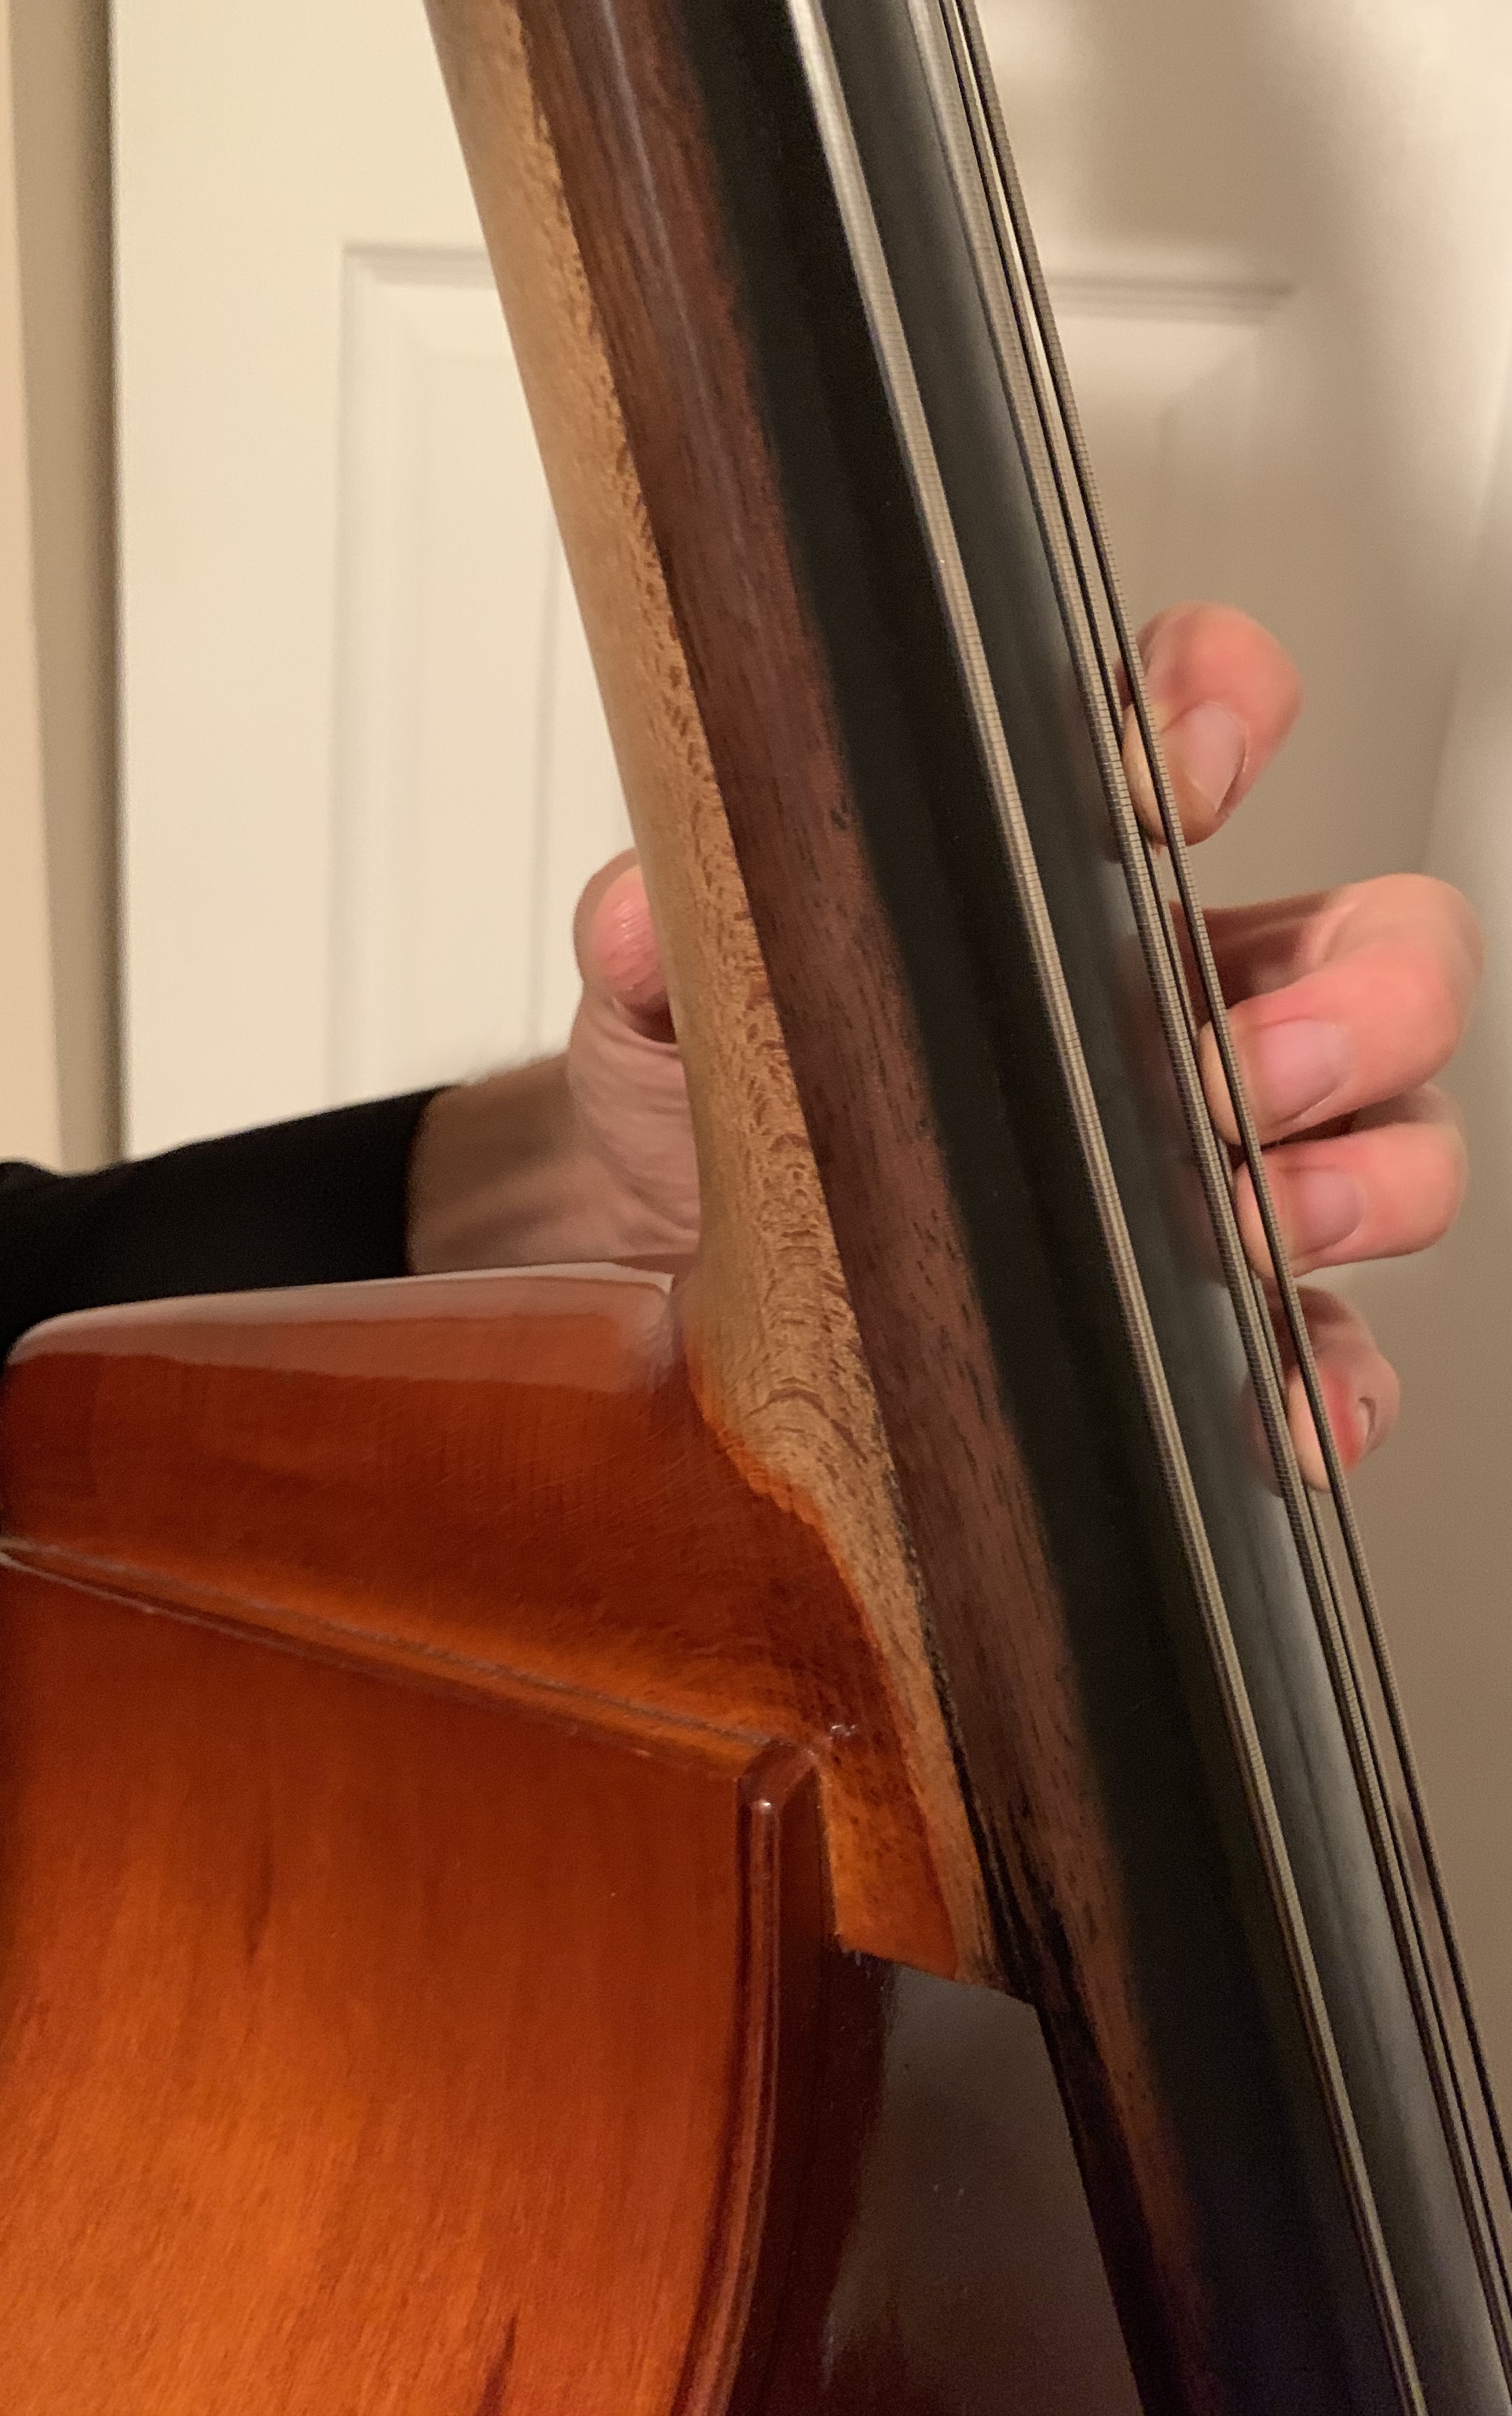
Example 2: Left hand in 3rd position, side view.
Starting students here will have the first finger starting on the D above the staff on the G string. Once students are comfortable and have a good set-up it’s much easier for them to move down into the lower positions. They will need to spread their fingers wider for the spacing between half steps and whole steps in those lower positions.
Of course, unless students begin by studying privately, most young bassists start in a group ensemble of some kind. In a classroom ensemble setting, young bassists are working alongside violinists, violists, and cellists, most likely, using a class method that can reach all of the instruments. Therefore, young bassists find themselves in first and half position as their starting point and playing a lot in unison with their upper string classmates. Therefore, young bassists will need to understand these positions. However, if you find them struggling consider giving them some exercises or the Vance material to start students at the neck block and reinforce a solid left hand technique.
Additional Principles
Left hand technique is a vast topic with new techniques and innovations happening all the time in how the bass is approached. I’ll begin to conclude with some final thoughts on helping students develop solid left hand technique.
Students should avoid their fingers collapsing and should try to press the string down more or less with the tips of their fingers. Traditionally in the lower positions, bassists use a first, second, and fourth finger system. The third finger, I tell students, is married to the second finger. It should be close together and helps to depress the string when playing with the fourth finger. This system changes when playing in thumb position and the third finger is then used, but when dealing in the lower positions, the first, second, and fourth fingers are traditionally employed. See example 3 as a reference point for all of these concepts in play.

Example 3: Left hand in first position. General shape of fingers, elbow, and left hand.
Common Challenges for Students and Potential Solutions
Naturally, when things are difficult we compensate any way we can. The same is true for bass playing. After teaching students for more than a decade now I’ve noticed common challenges for students.
- Fingers collapse
- Their thumbs over rotate around the neck of the bass
- They have difficulty keeping their fingers wide enough or spread out enough, especially in the lower positions
- Left elbow drops
- They press too hard and cause pain in the thumb or fingers
Young bassists need gentle reminders about proper hand position and technique. Of course, correct modeling is key. Here are some ideas help solve these technical issues:
- Slow practice to reinforce left hand concepts.
- If possible, have a mirror at the ready so students can assess their own technique and correct it when they slip. Practicing in front of a mirror has always been one of the most humbling learning experiences in my own playing!
- Have students pair up with a buddy or another bass playing to offer constructive help and assessment.
- Have students view great performers on the bass and describe their approach to the bass..
- Provide pictures of great bassists playing with solid technique (see the George Vance Progressive Repertoire Volume 1 Series or other resources for excellent reference pictures).
- Have students depress strings without the thumb, just the primary fingers, to stimulate the fingers for a moment and eliminate any pain or undue pressure on the thumb. Have them then play with the thumb back on the neck and assess for any difference in how they are approaching the bass.
- Three note chromatic patterns to reinforce finger placement and position.
- Place a sticky note to the heel of the neck that will stick up and remind students to keep their left elbow up, instead of dropping it down.
Conclusion
There is no one size fits all to left hand technique and each student’s physical abilities are different and each student responds differently to instructional methods. I do hope this provides a helpful framework for facilitating solid left hand fundamentals. If you have other ideas or best practices from your teaching, please leave a comment!
I started with a new book at my two middle schools in 2023-2024 – Artistry in Strings, and I bought the Bass Middle Position Book, which agrees with your pointer on the G String at High D to start; Artistry simply calls this Middle Position. I accessed your wonderful article from an internet search-Traditional Bass Fingering Positions. I used to carry around a page from the Anderson Scales for Strings Book which showed all the Traditional Positions, including the half-positions, but I can’t locate it right now, as I am suffering from moving at both my schools. Is there an on-line resource that shows the traditional positions?
I really like the idea of young hands starting in middle position; I first heard of it from Dan Swaim, who was teaching Beginning Suzuki Bass Classes in thumb position in the 80s? 90s? – seems to have disappeared!
Hi Bill,
Thanks for your insightful comments. I do believe I have the Artistry in Strings books in my school library as well, but haven’t looked into them. I will have to check them out.
I agree with you. In terms of encouraging a solid hand shape, finger spacing, and so on – starting near the neck block makes a lot of sense for young students. Regarding a fingering chart, I believe there is one in the Simandl book. Also look at this resource -> https://gollihurmusic.com/upright-bass-fingering-charts/
Thanks again!
Hi Mark,
Thanks so much for the response, and the link. Speaking of the solid hand shape, do you lean the bass toward you or away from you. I’m a stool guy, and I can’t play till I get the bass leaning toward me, with both hands free. By the way, I used to get lightweight collapsible bass stools (which I loved; adjustable to any height unless you’re really tall, but Golihur doesn’t seem to have them any more.) Do you have a set-up bass video you recommend? Sitting? Standing?
Thanks a million